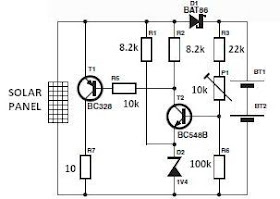
This is a simple solar charger circuit can be constructed using this circuit diagram .The nominal voltage of the solar charger circuit module is determined by the number of battery cells to be charged. Because of the typical voltage drop of 0.3 to 0.4 V across Schottky diode D1, the nominal voltage should exceed the charge voltage set on P1 by about 0.3–0.4 V.
Simple Solar Charger Circuit Diagram
The solar panel for this project is a typical solar module that consists of eight series connected solar cells. In sunshine the solar panel will supply about 140 mA -200mA or more( depends of the solar panel used ) at 8 times 0.45 V = 3.6 V.
If you don’t find a zenner diode with this value you can use two normal diodes connected in forward bias ( cathode connected to the ground ) .
Using the P1 potentiometer you can set the final charging voltage at the desired voltage .The voltage across the batteries is continuously monitored by the circuit around T2.
When the voltage rises above a certain level (full charge ), a power resistor is switched in parallel with the solar panel, which causes output voltage of the solar panel to drop and stops the batteries from being charged .


0 comments:
Post a Comment